GREENGAGE UPGRADE
Major Greengage upgrade using pg_upgrade and ggupgrade
26.06.2026
Exploring a major Greengage upgrade from version 6 to 7: how pg_upgrade works, what steps are required to upgrade a cluster, how ggupgrade helps, and how much time file copying and hard link mode can save.
Olga Sergeeva
Software Architect

Contents
This article describes the process of a major upgrade of the Greengage DBMS using the pg_upgrade and ggupgrade utilities.
At the time of publication, the utilities are in the final stages of development, testing, and debugging.
All further descriptions and examples apply to upgrading Greengage from version 6 to 7.
Introduction
Modern applications that need to store and access data are unthinkable without a reliable and high-performance database management system (DBMS). Upgrading a DBMS, like any other software, is a critical process. There are many reasons to upgrade a DBMS, all aimed at improving the stability, security, and efficiency of your infrastructure.
Here are the main reasons to upgrade the DBMS:
-
Improved security.
-
Increased performance.
-
New functionality.
-
Up-to-date versions and community support. Staying on current versions allows you to receive full support from the community and developers.
For more details on changes in new Greengage versions, see the Releases page.
A DBMS upgrade can be divided into two types: minor and major. A minor version upgrade of PostgreSQL and Greengage DBMS (for example, from version 6.29 to 6.30) assumes that the data storage format will not change, so updating the DBMS binary files is enough. A major version upgrade (for example, from version 6.29 to 7.4) can change the structure of system objects, so updating the binary files is not enough — you need to migrate data to a cluster of the next major version.
Data migration is performed using a logical backup, which takes quite a long time. While creating a logical backup, the cluster must be in a read-only state, and during restore it must be completely stopped if restoring to the same infrastructure. In production environments, minimizing database downtime is especially critical. For databases of hundreds of terabytes or more, as with Greengage, this may result in hours or even days of downtime, which is unacceptable for mission-critical business processes.
Upgrade PostgreSQL using pg_upgrade
A Greengage cluster is a distributed cluster that consists of dozens or hundreds of PostgreSQL-based instances.
For more information about the Greengage architecture, see the documentation.
Therefore, let’s first consider the pg_upgrade utility for upgrading PostgreSQL, since it is used as the basis for upgrading a Greengage cluster.
The idea behind pg_upgrade is that major versions mainly change the system catalog structure, while physical data storage itself does not change, with some exceptions discussed below.
Therefore, the utility generates commands that create objects (databases, schemas, tables, functions, and so on) and runs them on the new server, then copies the data files.
New objects must have the same identifiers as on the source cluster.
This is mainly because the data stores references to TOAST tables, that is, it contains the oid values of TOAST tables.
The oid of an existing object cannot be changed.
Before creating each object, pg_upgrade calls a function that stores the required oid, and the saved value is then used to create the object.
Thus, all user objects have the same identifiers on the new cluster as on the cluster being upgraded.
Next, data files of the generated objects are copied to the new cluster.
If copying data files is replaced with creating hard links (enabled by the --link option in pg_upgrade), the upgrade process will be faster than in data file copy mode.
In hard link mode, pg_upgrade does not copy the source cluster data files but creates hard links to them in the cluster being upgraded.
The old cluster data files can later be deleted; this will not affect the target cluster data.
The only limitation is changing data in the old cluster, because in this case the same file used in the new cluster will be modified.
When using hard links, the source and target clusters cannot be used at the same time; otherwise, the same data will be modified.
For the user, the PostgreSQL upgrade procedure using pg_upgrade looks as follows:
-
Installing a new PostgreSQL version on the cluster to be upgraded.
-
Initializing the target cluster with the new version.
-
Running the
pg_upgradeutility with the specified binary file and data directories for the source and target clusters.
The pg_upgrade utility performs a preliminary check of the server being upgraded, which may result in the following errors:
-
Deprecated data types.
-
Unsupported syntax.
-
Objects whose physical data layout has changed and whose data cannot be migrated by copying files, for example, indexes on partitioned tables. In this case, you need to drop the index and create it on the new cluster.
-
Missing extensions.
If there are objects whose data cannot be migrated by copying files, pg_upgrade will return an error.
Such objects must be migrated separately, which can still be much faster than migrating all data using a logical backup.
This migration can be performed by ggupgrade using additional scripts described later in this topic.
If errors occur, the old cluster remains unaffected and can continue to be used.
You can fix the errors and run pg_upgrade again.
Note that when migrating to the next version via a logical backup, most of the errors described above can also occur.
Before upgrading a cluster, it is recommended to carefully review the changes in the version you plan to upgrade to.
Upgrade Greengage using pg_upgrade
Because Greengage consists of multiple PostgreSQL instances, a Greengage upgrade utility can be implemented based on PostgreSQL’s pg_upgrade.
Greengage has objects that are not present in PostgreSQL, such as append-optimized tables. Such tables have auxiliary tables whose structure can also change in a new major version, so it is not possible to migrate data from these tables by copying files (or using hard links). These are the following auxiliary tables:
-
pg_aocsseg -
pg_aovisimap -
pg_aoblkdir
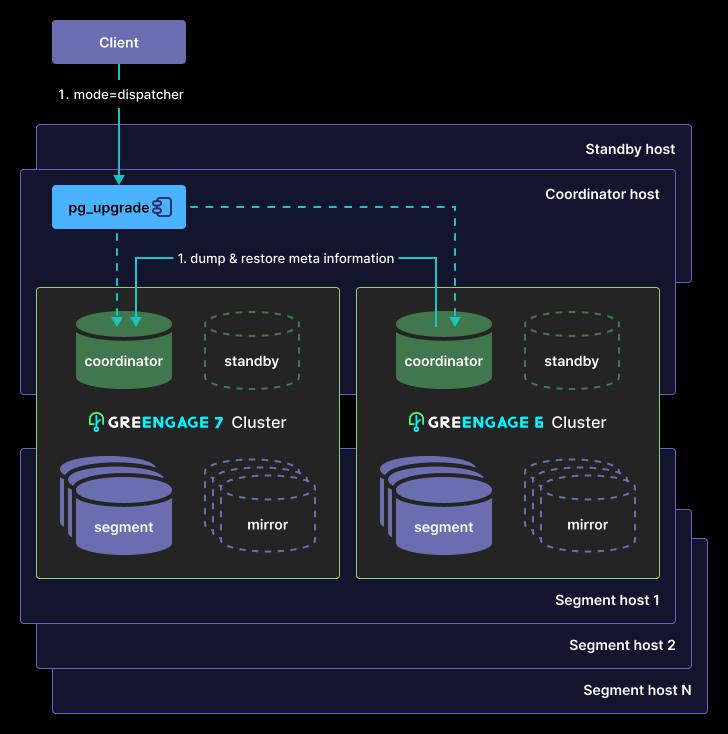
It is suboptimal to generate and create objects on all segments of the Greengage cluster. Because the object structure in the cluster (metadata) is identical on all segments, there is no need to create all objects on all cluster segments each time. It is enough to create objects on the coordinator and copy the resulting system catalog files from the coordinator to the segments. On the segments, the remaining task is to copy the data files or create hard links.
Thus, the pg_upgrade utility for Greengage is a modified PostgreSQL pg_upgrade utility for Greengage objects and optimized for updating metadata.
It has two run modes for this:
-
dispatcher— runs on the coordinator to generate metadata. -
segment— runs on segments to transfer data.
Before running pg_upgrade, stop the source and target clusters.
The Greengage cluster upgrade procedure using the pg_upgrade utility is as follows:
-
Running
pg_upgradeon the coordinator to create database objects with the same identifiers as in the previous-version cluster, indispatchermode:
-
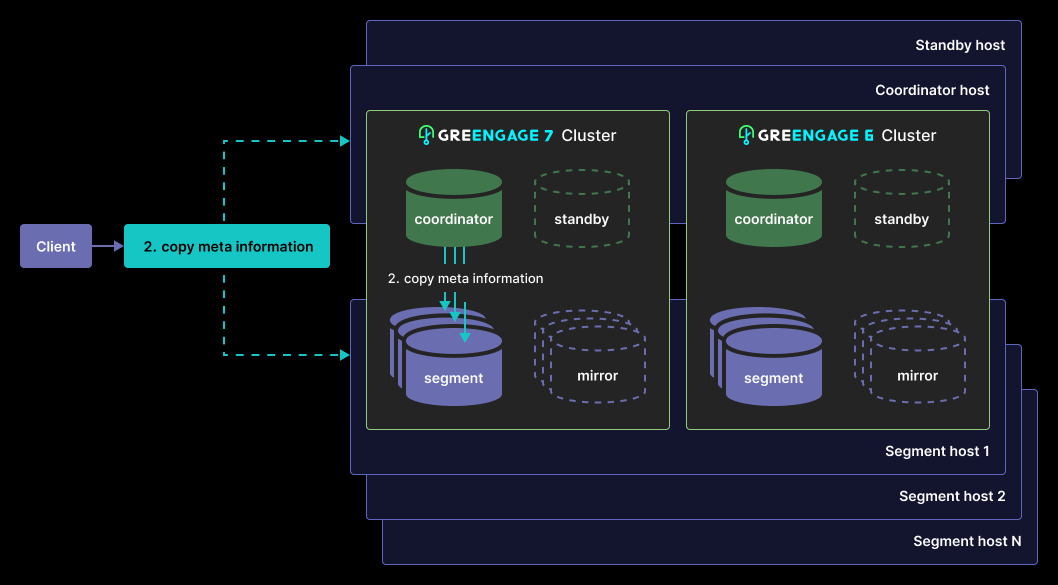
Copying metadata files to segments:
-
Running
pg_upgradeon primary segments to copy data files or create hard links (the--linkoption):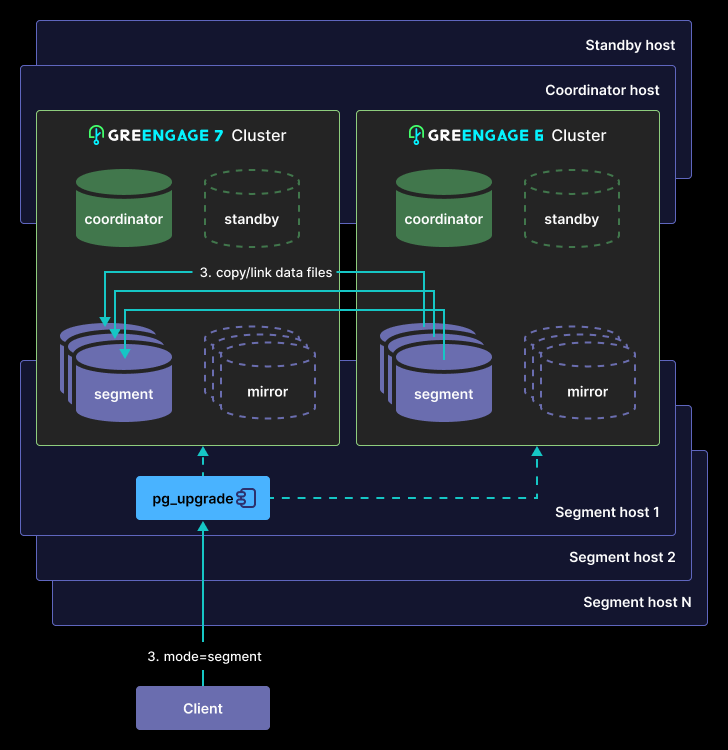
-
Running gprecoverseg to recover mirror segments.
-
Re-creating standby with gpinitstandby.
After starting, updating statistics, and checking the new cluster version, you can remove the old cluster; pg_upgrade generates scripts for this purpose.
The following example shows an upgrade of a Greengage 6 cluster to Greengage 7 on Ubuntu 22.04, where a version 7 cluster is already installed and initialized. This example is provided to help understand how a major Greengage upgrade works and can be reproduced on test Greengage clusters.
Upgrade a Greengage 6 cluster to Greengage 7 on Ubuntu 22.04
To upgrade a Greengage cluster, first install the new Greengage version on all hosts of the current-version cluster.
The modified pg_upgrade utility is included with Greengage 7.
Installation and initialization of a Greengage cluster are described in detail in the Greengage documentation.
To avoid conflicts when installing the inetutils-ping utility in Ubuntu, remove it from the Ubuntu dependency installation before running README.Ubuntu.bash, because it was already installed for Greengage 6:
# remove the inetutils-ping installation from the README.Ubuntu.bash file
$ sed -i 's/inetutils-ping / /g' README.Ubuntu.bash
After installing Greengage 7 binaries on all cluster hosts, you need to initialize it on the coordinator using gpinitsystem with the same configuration (with the same number of hosts and segments, as well as the same set of extensions) as the cluster being upgraded.
The following examples show commands for upgrading a cluster. Proceed to the next step only after the previous one has completed successfully.
1. Update metadata on the coordinator
To update metadata on the coordinator, stop the version 6 and 7 clusters and run the following commands:
# set paths to Greengage
# /usr/local/gpdb7 - directory where Greengage 7 is installed
# /ggdb7/data1/master/gpseg-1 - coordinator data directory
# 5433 - Greengage 7 cluster port
$ source /usr/local/gpdb7/greengage_path.sh && export MASTER_DATA_DIRECTORY=/ggdb7/data1/master/gpseg-1 && export PGPORT=5433

# run the pg_upgrade utility installed with Greengage 7
# /usr/lib/gpdb/bin - directory with Greengage 6 binaries
# /usr/local/gpdb7/bin - directory with Greengage 7 binaries
# /data1/master/gpseg-1 - Greengage 6 cluster data directory
# /ggdb7/data1/master/gpseg-1 - Greengage 7 cluster data directory
$ pg_upgrade -b /usr/lib/gpdb/bin -B /usr/local/gpdb7/bin -d /data1/master/gpseg-1 -D /ggdb7/data1/master/gpseg-1 --mode=dispatcher
If errors occur, you can continue using the old cluster. The upgrade to the new version will not be performed.
To resolve errors during the update, you need to:
-
Replace objects in the source cluster, taking into account differences between Greengage versions 6 and 7.
-
Install the required extensions on the new cluster that were used in the source cluster.
-
Objects that cannot be migrated by copying data files and cause errors should be dumped separately and removed before retrying the upgrade. These include, for example, tables containing composite system data types and indexes of partitioned tables. After the upgrade, the dumped objects must be loaded separately to the new cluster.
After resolving the issues and rerunning pg_upgrade on the coordinator, the following information is displayed if it completes successfully:
    Performing Consistency Checks
    -----------------------------
    Checking cluster versions                                   ok
    Checking database user is the install user                  ok
    Checking database connection settings                       ok
    Checking for prepared transactions                          ok
    Checking for system-defined composite types in user tables  ok
    ...
    Performing Consistency Checks
    -----------------------------
    Checking cluster versions                                   ok
    Checking database user is the install user                  ok
    Checking database connection settings                       ok
    Checking for prepared transactions                          ok
    Checking for system-defined composite types in user tables  ok
    Checking for reg* data types in user tables                 ok
    Checking for contrib/isn with bigint-passing mismatch       ok
    Checking for online expansion status                        ok
    Checking for external tables used in partitioning           ok
    Checking for non-covering indexes on partitioned AO tables  ok
    Checking for indexes on partitioned tables                  ok
    Checking for orphaned TOAST relations                       ok
    Checking array types derived from partitions                ok
    Checking for multi-column LIST partition keys               ok
    Checking for functions dependent on plpython2               ok
    Checking for views with removed operators                   ok
    Checking for views with removed functions                   ok
    Checking for views with removed types                       ok
    Checking for disallowed OPERATOR =>                         ok
    Checking for SHA-256 hashed passwords                       ok
    Checking for removed "abstime" data type in user tables     ok
    Checking for removed "reltime" data type in user tables     ok
    Checking for removed "tinterval" data type in user tables   ok
    Checking for tables WITH OIDS                               ok
    Checking for invalid "sql_identifier" user columns          ok
    Checking for invalid "unknown" user columns                 ok
    Checking for roles starting with "pg_"                      ok
    Checking for appendonly materialized view with relfrozenxid ok
    Creating dump of global objects                             ok
    Creating dump of database schemas
                                                                ok
    Checking for presence of required libraries                 ok
    Checking database user is the install user                  ok
    Checking for prepared transactions                          ok
    Checking for new cluster tablespace directories             ok

    If pg_upgrade fails after this point, you must re-initdb the
    new cluster before continuing.

    Performing Upgrade
    ------------------
    Analyzing all rows in the new cluster                       ok
    Freezing all rows in the new cluster                        ok
    Setting next distributed transaction ID for new cluster     ok
    Deleting files from new pg_xact                             ok
    Copying old pg_clog to new server                           ok
    Setting oldest XID for new cluster                          ok
    Setting next transaction ID and epoch for new cluster       ok
    Deleting files from new pg_multixact/offsets                ok
    Copying old pg_multixact/offsets to new server              ok
    Deleting files from new pg_multixact/members                ok
    Copying old pg_multixact/members to new server              ok
    Setting next multixact ID and offset for new cluster        ok
    Resetting WAL archives                                      ok
    Setting next OID for new cluster                            ok
    Deleting files from new pg_distributedlog                   ok
    Copying old pg_distributedlog to new server                 ok
    Setting frozenxid and minmxid counters in new cluster       ok
    Restoring global objects in the new cluster                 ok
    Restoring database schemas in the new cluster
                                                                ok
    Invalidating bitmap indexes in new cluster                  ok
    Freezing all rows in new master after pg_restore            ok
    Copying user relation files
                                                                ok
    Sync data directory to disk                                 ok
    Creating script to analyze new cluster                      ok
    Creating script to delete old cluster                       ok
    Checking for hash indexes                                   ok
    Checking for extension updates                              ok

    Upgrade Complete
    ----------------
    Optimizer statistics are not transferred by pg_upgrade so,
    once you start the new server, consider running:
        ./analyze_new_cluster.sh

    Running this script will delete the old cluster's data files:
        ./delete_old_cluster.sh
2. Copy metadata files from the coordinator to primary segments
First, clean up the data directories on the primary segments:
# segment_hosts.hosts - file describing all segment hosts in the cluster
# /ggdb7/data1/primary/data - auxiliary directory
$ gpssh -f segment_hosts.hosts -e 'rm -r /ggdb7/data1/primary/*/*/' && \
  gpssh -f segment_hosts.hosts -e 'mkdir /ggdb7/data1/primary/data'
Copy data files to each primary segment on each segment host:
# copy data
$ gpscp -f segment_hosts.hosts -r /ggdb7/data1/master/gpseg-1/*/ =:/ggdb7/data1/primary/data && \
  gpssh -f segment_hosts.hosts -e 'find /ggdb7/data1/primary -type d -name "gpseg*" -exec cp -r /ggdb7/data1/primary/data/* {} \;' &&  \
# remove the auxiliary directory
  gpssh -f ~/segment_hosts.hosts -e 'rm -r /ggdb7/data1/primary/data'
3. Run pg_upgrade on all segments
To run pg_upgrade in file copy mode on all segments, use the following command on the coordinator:
# run the pg_upgrade utility installed with Greengage 7 on segments
# /usr/lib/gpdb/bin - directory with Greengage 6 binaries
# /usr/local/gpdb7/bin - directory with Greengage 7 binaries
# /data1/primary - data directory of Greengage 6 primary segments
# /ggdb7/data1/primary - data directory of Greengage 7 primary segments
$ gpssh -f segment_hosts.hosts -e 'source /usr/local/gpdb7/greengage_path.sh && for dir in $(ls /ggdb7/data1/primary) ; do pg_upgrade -b /usr/lib/gpdb/bin -B /usr/local/gpdb7/bin -d /data1/primary/$dir -D /ggdb7/data1/primary/$dir --mode=segment; done'
To run pg_upgrade in hard link mode, add the --link option:
$ gpssh -f segment_hosts.hosts -e 'source /usr/local/gpdb7/greengage_path.sh && for dir in $(ls /ggdb7/data1/primary) ; do pg_upgrade -b /usr/lib/gpdb/bin -B /usr/local/gpdb7/bin -d /data1/primary/$dir -D /ggdb7/data1/primary/$dir --mode=segment --link; done'If there are no errors, the following information should be displayed for each segment:
    Performing Consistency Checks
    -----------------------------
    Checking cluster versions                                   ok
    Checking database user is the install user                  ok
    Checking database connection settings                       ok
    Checking for prepared transactions                          ok
    Checking for system-defined composite types in user tables  ok
    ...
    Performing Consistency Checks
    -----------------------------
    Checking cluster versions                                   ok
    Checking database user is the install user                  ok
    Checking database connection settings                       ok
    Checking for prepared transactions                          ok
    Checking for system-defined composite types in user tables  ok
    Checking for reg* data types in user tables                 ok
    Checking for contrib/isn with bigint-passing mismatch       ok
    Checking for external tables used in partitioning           ok
    Checking for non-covering indexes on partitioned AO tables  ok
    Checking for indexes on partitioned tables                  ok
    Checking for orphaned TOAST relations                       ok
    Checking array types derived from partitions                ok
    Checking for multi-column LIST partition keys               ok
    Checking for functions dependent on plpython2               ok
    Checking for views with removed operators                   ok
    Checking for views with removed functions                   ok
    Checking for views with removed types                       ok
    Checking for disallowed OPERATOR =>                         ok
    Checking for SHA-256 hashed passwords                       ok
    Checking for removed "abstime" data type in user tables     ok
    Checking for removed "reltime" data type in user tables     ok
    Checking for removed "tinterval" data type in user tables   ok
    Checking for tables WITH OIDS                               ok
    Checking for invalid "sql_identifier" user columns          ok
    Checking for invalid "unknown" user columns                 ok
    Checking for roles starting with "pg_"                      ok
    Checking for appendonly materialized view with relfrozenxid ok
    Checking for presence of required libraries                 ok
    Checking database user is the install user                  ok
    Checking for prepared transactions                          ok
    Checking for new cluster tablespace directories             ok

    If pg_upgrade fails after this point, you must re-initdb the
    new cluster before continuing.

    Performing Upgrade
    ------------------
    Freezing all rows in the new cluster                        ok
    Setting next distributed transaction ID for new cluster     ok
    Deleting files from new pg_xact                             ok
    Copying old pg_clog to new server                           ok
    Setting oldest XID for new cluster                          ok
    Setting next transaction ID and epoch for new cluster       ok
    Deleting files from new pg_multixact/offsets                ok
    Copying old pg_multixact/offsets to new server              ok
    Deleting files from new pg_multixact/members                ok
    Copying old pg_multixact/members to new server              ok
    Setting next multixact ID and offset for new cluster        ok
    Resetting WAL archives                                      ok
    Setting next OID for new cluster                            ok
    Deleting files from new pg_distributedlog                   ok
    Copying old pg_distributedlog to new server                 ok
    Restoring append-only auxiliary tables in new cluster       ok
    Copying user relation files
                                                                ok
    Setting database system identifier for new cluster          ok
    Sync data directory to disk                                 ok
    Creating script to analyze new cluster                      ok
    Creating script to delete old cluster                       ok
    Checking for hash indexes                                   ok
    Checking for extension updates                              ok

    Upgrade Complete
    ----------------
    Optimizer statistics are not transferred by pg_upgrade so,
    once you start the new server, consider running:
        ./analyze_new_cluster.sh

    Running this script will delete the old cluster's data files:
        ./delete_old_cluster.sh
4. Verify the upgraded cluster and run gprecoverseg
After the upgrade, start the version 7 cluster, verify that it is operational, and start mirror recovery:
# set the path to Greengage 7
$ source /usr/local/gpdb7/greengage_path.sh && export MASTER_DATA_DIRECTORY=/ggdb7/data1/master/gpseg-1 && export PGPORT=5433

# start the version 7 cluster
$ gpstart

# check
$ psql postgres

# recover mirrors
$ gprecoverseg -F
Comparison of gpbackup/gprestore and pg_upgrade for upgrading Greengage from version 6 to 7
We have compared Greengage upgrades from version 6 to version 7 using a logical backup and using pg_upgrade on the same cluster.
The Greengage cluster consisted of a coordinator and two segment hosts with the following parameters.
| Type | CPU | RAM | HDD | Data size |
|---|---|---|---|---|
Coordinator |
8 |
32 GB |
150 GB |
17 GB |
Segment 1 |
16 |
32 GB |
1.5 TB |
364 GB (primary) + 360 GB (mirror) |
Segment 2 |
16 |
32 GB |
1.5 TB |
364 GB (primary) + 360 GB (mirror) |
The cluster database contained 90,000 evenly populated tables, including 76,000 append-optimized tables.
The following results were obtained.
| Operation | Elapsed time |
|---|---|
|
1 h 10 min |
|
1 h |
Creating metadata |
10 min |
|
5 h 7 min |
|
5 h 8 min |
Total |
6 h 18 min |
| Operation | Elapsed time |
|---|---|
|
10 min |
Copying metadata to segments |
5 min |
Segment upgrade in file copy mode |
1 h 50 min |
Segment upgrade in hard link mode ( |
15 min |
Total time in |
2 h 5 min |
Total time in |
25 min |
In file copy mode, pg_upgrade is approximately three times faster than data migration using a logical backup.
In hard link mode, pg_upgrade provides up to a 15x performance improvement.
Overall, the data transfer speed gain with pg_upgrade reaches up to 20x!
Hard link mode has an additional advantage: since data files are not copied and only hard links are created, it requires significantly less free disk space — only for metadata and separately transferred objects.
Upgrade Greengage using ggupgrade
The excellent results achieved with pg_upgrade motivate further development of this mechanism.
As shown in the example above of upgrading Greengage using pg_upgrade, the process still requires a significant number of manual steps.
To automate this work, the ggupgrade utility was created, which performs the following:
-
initializes a new cluster;
-
runs additional scripts on the old cluster;
-
runs
pg_upgradeon the coordinator; -
copies metadata to all segments;
-
runs
pg_upgradeon all primary segments; -
runs scripts on the new cluster;
-
updates standby and mirrors;
-
configures the new cluster to use the port of the old cluster.
It is worth noting that with pg_upgrade, the new-version cluster had to be initialized first, while ggupgrade does this automatically based on the old cluster configuration.
An interesting feature has been added: the ability to run additional scripts.
Additional scripts are scripts that help work around certain issues during upgrade using pg_upgrade.
For example, for indexes on partitioned tables, additional scripts generate commands to create these indexes for later execution on the new cluster and drop them in advance on the old cluster.
Users can add their own scripts.
To upgrade a cluster using ggupgrade, the user needs to:
-
Install the new Greengage version on all hosts of the cluster being upgraded.
-
Install/copy the
ggupgradeutility to all hosts of the cluster being upgraded. -
Copy additional scripts to the coordinator.
-
Add the path to
ggupgradetoPATHon the coordinator. -
Edit the configuration file on the coordinator.
Example content of the ggupgrade_config configuration file for
ggupgrade:# The source cluster master port. source_master_port = 5432 # The installation path for the source cluster. # For example, /usr/local/<source-greengage-version>. source_gphome = /usr/lib/gpdb # The installation path for the target cluster. # For example, /usr/local/<target-greengage-version>. target_gphome = /usr/local/gpdb7 # Whether to upgrade using "link" or "copy" mode. # The copy method performs the upgrade on a copy of the primary segments. # The link method directly upgrades the primary segments. mode = link -
Run
ggupgradeon the coordinator. There are four main stages of the utility workflow:-
initialize, where the version 7 cluster is initialized, additional scripts are run, statistics are collected, and possible upgrade issues are checked. -
execute, wherepg_upgradeis run on the coordinator and all segments, with metadata copied from the coordinator to the segments. -
revert, which restores the version 6 cluster to its initial state. This mode can be run at any stage beforefinalize. -
finalize, where additional scripts are run, statistics are updated, and the upgraded cluster is started on the port of the original cluster.
Example of running
ggupgrade:# initialization stage $ ggupgrade initialize -v -f /opt/ggupgrade/ggupgrade_config # execution stage $ ggupgrade execute # finalization stage $ ggupgrade finalize -
Conclusion
The current implementations of pg_upgrade and ggupgrade are already showing strong performance results.
We invite everyone to put them to the test in their own test environments — your feedback is important for the final release.